


写在前面
前一阵在mozilla官网上找东西,突然看到了webRTC,有些兴趣,浅浅研究了一下。
这篇文章会很长,涉及到运维 、 前端的相关领域,技术涉及主要是Linux、网络知识、Docker、Coturn、NodeJs、TypeScript、H5、ssl,同时我也会稍稍介绍一下webRTC的工作基本原理。
一、什么是webRTC
webRTC是google收购并二次开发推广的一个web领域针对音视频的基础支持服务,已经内置在浏览器中,可以直接使用。但是当下针对PC与移动端的浏览器适配问题是一个非常大的考验。更详细的介绍请移步 webrtc官网
二、webRTC的工作原理
webRTC实际上没有做什么事情,仅仅是做了通过浏览器调用到设备的输入内容,通过网络发送到远端,同时在远端能够显现罢了。
实现这个功能主要考虑两个问题:
1、如何让不同网络环境下的设备彼此联系上,能够进行数据交互。
2、如何让不同的设备使用双方都能处理的方式来处理数据(编解码等)。
webRTC的工作基本原理:
1、ICE及多媒体协商:
-
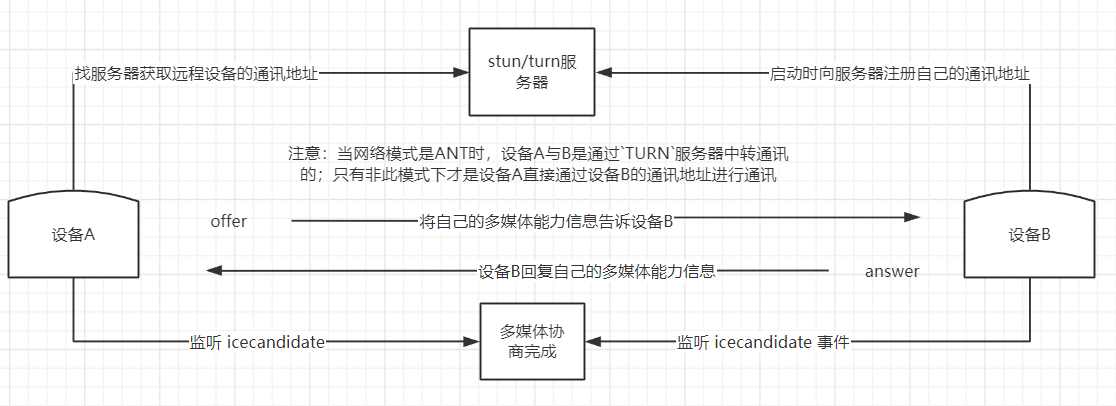
先获得远端的通讯地址:通过
stun服务器来获取注册的远端通讯地址(ip:port);若网络是ANT环境,则需要turn服务器。这个过程叫ICE协商。 -
告诉远端自己本地的音视频能力范围:音视频发起方通过
stun服务器找到目标的远端通讯地址(ip:port),马上发起一个会话协商,把自己设备的一些信息发送过去,比如支持的流编码/解码等,方便对方了解自身的情况。这个动作叫offer。 -
远端收到
offer并回复自己本地的音视频能力范围:远端收到offer消息之后会存储起来,同时会马上发起一个回复协商,同样把自己设备的一些信息发送过去,比如支持的流编码/解码等,方便对方了解自身的情况。这个动作叫answer。 -
两端同时监听
icecandidate事件,当offer、answer都完成后,多媒体协商结束。流程图示意如下:
2、获取设备流及传输:
- 获取音视频流:获取摄像头、麦克风、屏幕窗口等功能均由浏览器内核完成。请参考 mozilla WebRTC_API
- 将数据流推入发送队列:将获得的数据流加入推送队列(这里已经不需要关心网络情况了),对应
addTrack - 远程数据流回显:监听
track事件,获取标准流。直接使用h5中的Video标签属性srcObject=标准stream。
三、搭建stun、turn服务器
入门介绍:
1、stun是一个开放式(非涉密)的信令服务器,相当于在公网上保存的一份通讯录。设备主动连接stun服务器即可将自身通讯地址加入到通讯录,同时也具备接受从stun服务器上获取信令信息的功能。
2、turn是一个涉密的打洞传输服务器,当设备处在ANT网络模式下时,就算知道了对方的远程通讯地址,彼此也是无法直接通信的,受到ANT的制约(除非单独做端口映射)。而turn就是让设备直接与turn服务器产生一个udp连接,通过这个udp通道将想要与其通讯的连接进行转发,通过中间人的方式实现设备之间的通讯。
目前主流实现此协议的开源项目,最主流的是 coturn,下面我将介绍如何使用docker搭建coturn服务器(demo学习,推荐使用docker方式)
- 新建一个文件夹
mkdir coturn - 在文件夹中创建一个文件
vi coturn/turnserver.conf - 填入以下内容
 # 监听端口
 listening-port=3478-需要在阿里云安全规则中放行这些端口的tcp和udp协议
 # 内网的ip地址-这里填`ifconfig 中通常在 eth0 下的ip`
 listening-ip=172.26.80.187
 # 这里写自己的公网ip,最好是域名
 realm=stun.ayouran.com
 # 可以使用的临时通讯端口范围-需要在阿里云安全规则中放行这些端口的tcp和udp协议
 min-port=10000
 max-port=20000
 #用户名:密码
 user=user:pwd123
 # 日志路径
 log-file=/tmp/turnserver.log
 # 显示日志,方便调试
 verbose
 # 定义pid位置-docker中默认在/var下,有权限问题,无法启动
 pidfile=/tmp/turnserver.pid
 # 不启用ssl
 no-tls
 no-dtls
 # 不启用cli管理
 no-cli
 # 启用指纹
 fingerprint
完整的配置详情参见 coturn turnserver.conf
- 最后进入工作文件夹
cd coturn - 执行启动
docker run --name coturn --privileged=true --network=host -d -v $(pwd)/turnserver.conf:/etc/coturn/turnserver.conf coturn/coturn
注意事项:
1、docker方式要使用--network=host,大量端口的映射会花费很长时间。
2、非docker的方式可以直接将listening-ip改成公网ip
3、查看日志docker exec -i coturn tail -n 300 -f /tmp/turnserver_2023-08-07.log,时间日期根据当前服务器时间来。
4、启动完成后可以使用 trickle-ice 试试连通性(个人觉得没什么用,不同浏览器检测结果不同,检测结果是不成功,但是实际上是可用的)
四、根据webRTC文档编写代码实现demo
官方文档地址 webrtc getting-started
由于在第二节已经解释过了webRTC的工作原理,这里我直接说明实现思路就贴上代码了哈。
1、通过stun服务器协商出来的offer、answer、icecandidate都需要与对方设备同步,所以这里必须自己构造一个通讯方式来传递它。这里我们使用WebSocket。
WebSocket服务端:
package.json内容如下
 "dependencies": {
    "fs": "*",
    "https": "^1.0.0",
    "ws": "^8.13.0"
  },
  "devDependencies": {
    "@types/node": "^14.14.22",
    "@types/ws": "^8.5.5",
    "nodemon": "^2.0.16",
    "ts-node": "^10.8.1",
    "typescript": "^4.7.3"
  }
WebSocket代码,我这里是用的wss,ws更加简单些
import {WebSocket} from "ws";
import * as https from "https";
import * as fs from "fs";
import path from "path";

const SOCKET_PORT = 8000;
const pathCertificati = "/root/wss"

// 创建request请求监听器
const processRequest = (req: any, res: any) => {
    res.writeHead(200);
    res.end('ok');
};

let serverHttps = https.createServer({
    key: fs.readFileSync(path.join(pathCertificati, 'privkey.key')),
    cert: fs.readFileSync(path.join(pathCertificati, 'fullchain.crt'))
}, processRequest).listen(SOCKET_PORT, () => {
    console.log('WebRTC信令中继服务器已启动,正在监听端口 ',SOCKET_PORT);
})
const wss = new WebSocket.Server({server: serverHttps});
// ===== 如果使用ws 而非wss,只需要把此行上方的代码全部改为http、ws即可
// 保存所有连接的客户端
const clients = new Set();

// 处理连接请求
wss.on('connection', ws => {
    console.log('客户端已连接');
    // 将新连接的客户端加入到集合中
    clients.add(ws);
    // 处理消息接收
    ws.on('message', (message) => {
        console.log('接收到消息:', message);
        if (message === undefined) return
        // 解析消息
        // @ts-ignore
        const data = JSON.parse(message);
        const {type, offer, answer, candidate} = data;

        // 根据消息类型进行处理
        switch (type) {
            case 'offer':
                handleOffer(offer, ws);
                break;
            case 'answer':
                handleAnswer(answer, ws);
                break;
            case 'candidate':
                handleIceCandidate(candidate, ws);
                break;
            default:
                console.log('未知的消息类型:', type);
                break;
        }
    });

    // 处理连接关闭
    ws.on('close', () => {
        console.log('客户端已关闭连接');
        // 将关闭的客户端从集合中移除
        clients.delete(ws);
    });
});

// 处理offer消息
function handleOffer(offer: any, sender: any) {
    // 将offer转发给其他连接的客户端
    broadcastMessage(JSON.stringify({type: 'offer', offer}), sender);
}

// 处理answer消息
function handleAnswer(answer: any, sender: any) {
    // 将answer转发给其他连接的客户端
    broadcastMessage(JSON.stringify({type: 'answer', answer}), sender);
}

// 处理iceCandidate消息
function handleIceCandidate(candidate: any, sender: any) {
    // 将iceCandidate转发给其他连接的客户端
    broadcastMessage(JSON.stringify({type: 'candidate', candidate}), sender);
}

// 广播消息给所有连接的客户端,除了发送者
function broadcastMessage(message: any, sender: any) {
    clients.forEach((client) => {
        // @ts-ignore
        if (client !== sender && client.readyState === WebSocket.OPEN) {
            // @ts-ignore
            client.send(message);
        }
    });
}
2、编写一个发起端,通过与stun、turn服务器及WebSocket的通讯交互来创建数据流的网络通道,随后向网络通道中推送数据流。
<!DOCTYPE html>
<html>
  <head>
    <title>发送端</title>
  </head>
  <body>
    <video id="localVideo" width="320" height="240" autoplay></video>
    <video id="remoteVideo" width="320" height="240" autoplay></video>
    <button onclick="startVideoCall()">开始视频通话</button>

    <script>
      // 建立WebSocket连接 --- ws 请改为 ws://localhost:8000
      const socket = new WebSocket("wss://localhost:8000");
      const config = {
        iceTransportPolicy: "relay",
        // rtcpMuxPolicy?: RTCRtcpMuxPolicy = "require";
        iceServers: [
          {
            urls: ["turn:localhost:3478?transport=udp"],
            username: "clenet",
            credential: "clenet123",
            credentialType: "password",
          },
          {
            urls: ["stun:localhost:3478"],
          },
        ],
      };
      let peerConnection = new RTCPeerConnection(config);
      let candidate;

      socket.onopen = function () {
        console.log("WebSocket连接已打开");
      };

      socket.onmessage = function (event) {
        const message = JSON.parse(event.data);

        if (message.type === "offer") {
          console.log("接收到offer");
          handleOffer(message.offer);
        } else if (message.type === "answer") {
          handleAnswer(message.answer);
        } else if (message.type === "candidate") {
          handleCandidate(message.candidate);
        }
      };

      function startVideoCall() {
        navigator.mediaDevices
          .getDisplayMedia({ video: true, audio: true })
          .then((stream) => {
            const localVideo = document.querySelector("#localVideo");
            localVideo.srcObject = stream;
            stream.getTracks().forEach((track) => {
              peerConnection.addTrack(track, stream);
            });

            peerConnection
              .createOffer()
              .then((offer) => {
                return peerConnection.setLocalDescription(offer);
              })
              .then(() => {
                const message = {
                  type: "offer",
                  offer: peerConnection.localDescription,
                };
                socket.send(JSON.stringify(message));
              })
              .catch((error) => {
                console.error("Error creating offer:", error);
              });
            peerConnection.addEventListener("icecandidate", (event) => {
              if (event.candidate) {
                candidate = event.candidate;
                socket.send(
                  JSON.stringify({
                    type: "candidate",
                    candidate: candidate,
                  })
                );
              }
            });
          })
          .catch((error) => {
            console.error("Error accessing media devices:", error);
          });
      }

      function handleAnswer(answer) {
        // const peerConnection = new RTCPeerConnection(config);

        peerConnection.ontrack = (event) => {
          const remoteVideo = document.querySelector("#remoteVideo");
          const [remoteStream] = event.streams;
          remoteVideo.srcObject = remoteStream;
        };

        peerConnection.setRemoteDescription(answer).catch((error) => {
          console.error("Error setting remote description:", error);
        });
      }

      function handleCandidate(candidate) {
        peerConnection.addIceCandidate(candidate).catch((error) => {
          console.error("Error adding ICE candidate:", error);
        });
      }
    </script>
  </body>
</html>
3、编写一个接受端,通过与stun、turn服务器及WebSocket的通讯交互来创建数据流的网络通道,随后接收网络通道中推送来的数据流显示在网页中。
<!DOCTYPE html>
<html>

<head>
  <title>接收端</title>
</head>

<body>
  <video id="localVideo" width="320" height="240" autoplay></video>
  <video id="remoteVideo" width="320" height="240" autoplay></video>

  <script>
   // 建立WebSocket连接 --- ws 请改为 ws://localhost:8000
    const socket = new WebSocket("ws://localhost:8000");

    const config = {
      iceTransportPolicy: "relay",
      // rtcpMuxPolicy?: RTCRtcpMuxPolicy = "require";
      iceServers: [
        {
          urls: ["turn:localhost:3478?transport=udp"],
          username: "clenet",
          credential: "clenet123",
          credentialType: "password",
        },
        {
          urls: ["stun:localhost:3478"],
        },
      ],
    };
    let peerConnection = new RTCPeerConnection(config);
    let candidate;
    socket.onopen = function () {
      console.log("WebSocket连接已打开");
    };

    socket.onmessage = function (event) {
      const message = JSON.parse(event.data);
      if (message.type === "offer") {
        handleOffer(message.offer);
      } else if (message.type === "answer") {
        handleAnswer(message.answer);
      } else if (message.type === "candidate") {
        handleCandidate(message.candidate);
      }
    };
    function handleOffer(offer) {
      peerConnection.ontrack = (event) => {
        const remoteVideo = document.querySelector("#remoteVideo");
        if (!remoteVideo.srcObject) {
          remoteVideo.srcObject = event.streams[0];
        }
      };

      navigator.mediaDevices
        .getUserMedia({ video: true, audio: true })
        .then((stream) => {
          const localVideo = document.querySelector("#localVideo");
          localVideo.srcObject = stream;

          stream.getTracks().forEach((track) => {
            peerConnection.addTrack(track, stream);
          });

          peerConnection
            .setRemoteDescription(offer)
            .then(() => {
              return peerConnection.createAnswer();
            })
            .then((answer) => {
              return peerConnection.setLocalDescription(answer);
            })
            .then(() => {
              const message = {
                type: "answer",
                answer: peerConnection.localDescription,
              };
              socket.send(JSON.stringify(message));
            }).then(() => {
              if (candidate) {
                handleCandidate(candidate)
              }
            })
            .catch((error) => {
              console.error("Error creating answer:", error);
            });
            peerConnection.addEventListener("icecandidate", (event) => {
                if (event.candidate) {
                  socket.send(JSON.stringify({ type: "candidate", candidate: event.candidate }));
                }
              });

        })
        .catch((error) => {
          console.error("Error accessing media devices:", error);
        });
    }

    function handleAnswer(answer) {
      peerConnection.ontrack = (event) => {
        const remoteVideo = document.querySelector("#remoteVideo");
        if (!remoteVideo.srcObject) {
          remoteVideo.srcObject = event.streams[0];
        }
      };

      peerConnection.setRemoteDescription(answer).catch((error) => {
        console.error("Error setting remote description:", error);
      });
    }

    function handleCandidate(cd) {
      if (peerConnection.localDescription && cd) {
        peerConnection.addIceCandidate(candidate);
      }
      candidate = cd;
    }
  </script>
</body>

</html>
注意:
- 这两个
html不能在同一个浏览器打开,要在不同浏览器或者不同的设备上打开,手机上看不到画面,但是可用正常调用摄像头和麦克风。 - 在本地使用
file模式打开或localhost域不会触发navigator的安全限制,如果做成网站使用,会被禁止。这就是为什么我这里的WebSocket是wss的原因。 - 一定要注意代码中协商过程的顺序,不能改变顺序,必须是
offer、answer、icecandidate这个顺序,icecandidate会触发多次,一定要等offer、answer都完成了才能设置icecandidate
到这里,本地已经完成了webRTC的全部功能。下面的部分是搞定浏览器内核对webRTC的安全限制,直接部署到公网上,通过一个网址来实现远程视频通讯或桌面共享。
五、公网部署webRTC
以上的步骤需要有以下调整:
1、将coturn服务器部署到具有公网ip的服务器上,记得将配置中的listening-port、min-port、max-port本地防火墙和网络安全组放通tcp、udp协议。
2、用certbot申请一个证书
3、将WebSocket由ws改为wss。
4、将两个html文件中的stun、turn服务器及WebSocket地址改为对应公网地址。
5、在公网服务上运行WebSocket服务端(wss服务)
6、使用静态代理(nginx、haproxy等)或者直接在WebSocket服务端上增加一个静态html的https服务代理功能。使得两个文件能通过https访问到。
到这里,公网部署webRTC完成了。基于某些原因不便于贴图展示最后的效果,各位自行尝试。有问题多看文档。
虽然certbot-auto已经被官方发布废弃了,但certbot的使用并无差别,就不再赘述,对ssl证书感兴趣的可以看这篇 乌班图20.04下申请ssl证书并自动续签

评论区